Showing posts with label transport. Show all posts

Sunday 19 October 2014

Replacing track ends. the pit falls.

the track rod ends on these vehicles are handed
nearside and offside.
Track rod end or track control arm ball joints no matter what you call it, it's at the end of the steering rack arms. For such a small ball joint it takes a lot of abuse from us the driver hitting curbs, bumping up them to park and potholes. It is surprising that they do not fail more often. It is all these little knocks and bump over time that led to them failing before they should. In most cases they are not noticed until they fail the MOT, or the worst-case scenario give up the ghost while we are driving down the road. I have been witnessing to number of these over the years.

There are some tell tail signs to alert us to their wearing out. Most of them do not happen until they are quite loose in the ball joint knuckle. Adverse wear on a tyre is one indicator. This looks like a tracking problem; what sets it apart from tracking is that the tyre looks more worn one side than the other. Another is an occasional slight wobble on the steering when gently braking. Unless you are very tuned in with your vehicle you will not notice it.

Once the bad news is in that your transport failed the MOT it is not that difficult a job to do. But I know there are a couple of 'buts' to take into account, even so, they do not add that much drama to the job.

Once the wheel nuts are loosened jack the vehicle up and place an axle stand under to support it just in case the jack fails. It does happen. Take the wheel off and turn the steering so the steering arm is fully extended this will allow fuller access to the ball joint. The first thing to do is loosen the tack rod end locking nut on the steering arm. These can be difficult to loosen, it is a good idea to soak it in freeing oil. You will have to use a C spanner on this nut so be careful as these spanners have a nasty habit of slipping off. 

Shocking ball joint loose

Now-a-days most ball joints are held in place with a Ni-lock nut the thread above the nut is most likely badly rusted. This is where an impact wrench is handy as this bit of kit will have the nut undone in no time. Again, soak in freeing oil. What happens is the nylon of the nut locks solid on the rusty thread which then brakes the taper hold allowing the whole thing to spin in place. Now the fun begins. If this happens you will need the jack to push the ball joint back into place. This will mean that you almost lift the van off the axle stand to recreate the hold it had. This is one of the only ways of doing it. Now you need a blow torch or nut heater so the nylon can be melted, and the nut expanded. While it is red hot it is possible to put a socket on it to complete the nuts removal. You will need to work quickly as the heat dissipates from the nylon allowing it to reform locking the nut again. Alternatively, you can if you have one use a nut splitter.

If the nut comes off as it should the ball joint now needs to be separated from the hub arm. There are a couple of ways of doing this, use a ball joint separation tool or jar it lose with a heavy hammer, this method is not for the faint heated.  It is my favoured way but then I have had a lot of practice honing it down to a fine art. If you decide to go this route, I suggest binding the handle where it meets the head of the hammer with plastic tape the type electricians use. You will need to wrap it around quite a few times. The reasoning behind this is if you miss, which you will, the hub arm will strike the hammers handle, the tape stops bits being taken out of the handle lessening the chances of the head being broken off. You will need to hit the arm with some force to get it to loosen and in most cases several hits will be required to get it to shift.

Please note: do not use the method described above unless you are confident to do so. Getting it wrong may damage the van and yourself. You have been warned.

wheel nut rotation of tightening
Once off, it is a good idea to count the number of turns it takes to remove the track rod end from the steering rack.

With the new track rod end in hand thread, it on to the arm the number of turns it took to take it off. By doing this it should return the tracking to what it was before you removed the old one. Lessening the need to get the tracking adjusted straight away.

Put the ball joint thread through the hub arm and tighten the nut to (37). Re tighten the steering rack nut to the back of the ball joint, it is a good idea to put a bit of copper grease on the thread to make it easier to undo next time. Put the wheel on, thread the bolts on and nip tight, drop the jack and tighten the wheel nut up to (140) in a diagonal rotation. This makes sure that each bolt is evenly tightened.

Please note that the numbers in the brackets (00) are torque wrench settings in Newton meters.
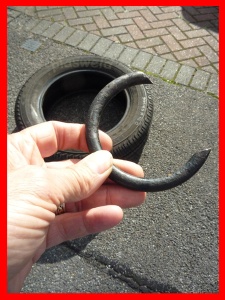
Great escape!

part-of-spring
The other day I had to nip out to get some materials. A bit of an understatement as it involved a journey of a hundred miles each way. As we were going up the bypass at the beginning of the trip there was a metallic clanging sound of something hitting the underside of the truck which slowed progress as I considered whether or not to stop and check. Needless to say, I didn't as the van felt and ran OK.
Ninety odd miles later. We stopped at a well-known supermarket for a break. To be met by a shushing noise. A quick look round the truck did not show anything untoward but the shh persisted; then I noticed that the rear near side tyre looked soft. In that short time, it was half flat, the air was coming out that fast. I can't believe it - another puncture! and its 
spring-in-tyre
the new one! I will not repeat what was said but I think you can guess!  
I ran round to the cab pulled out the jacking kit and got it in place just before it went completely flat. Ten minutes later the Tyre was changed.
Before we returned home, I wanted the puncture repaired, so tracked down a tyre shop and took it in. "No prob' mate have that done for you in a jiffy". Then things went sideways I saw him call over a colleague and then me. It took us all by surprise. I was told that I had been extremely lucky that it had not blown apart when it happened. The pictures speak for themselves!

Saturday 10 August 2013

Lane hogging becomes a road traffic offence

This is just a heads up. How you drive is up to you.  I am not sure who said this to me:. Ignorance is no defense in the eyes of the law.

This was copied from the ITV news so if you would like to know more click the link.


Middle lane hoggers to face on-the-spot fines

Drivers who hog the middle lane or tailgate other cars face on-the-spot fines of £100 and three points on their licence, under new measures announced today.
The fine for using a hand-held mobile phone while driving or not wearing a seat belt will also rise from £60 to £100.
Report by Amy Welch.

Saturday 27 July 2013

Handbrake fails MOT.

Handbrake adjuster
This is a stressful time for the motorist; it is where you hand over your pride and joy to a third party to be poked, prodded and shaken into revealing those profitable faults for the garage. If you are an owner maintainer you should be able to minimize these unexpected failures because you regularly service and put right problems as they show up. I know in practice this is not always the case. But it is better and more cost effective if you do, than to be thrown in at the deep end when you are at your busiest.

MOT testers are human and have pet hates. As an ex-tester mine were lights not working and torn wipers. To me this indicated that it may have other MOT issues which proved to be the case on many occasions.


Brake fluid
I am not immune from the unexpected. Having checked the van over and put right the sticking hand brake again, I was confident that it should
 pass its MOT. The van and tester had other ideas. It failed! I was expecting him to say it was a ball joint but no it was that damned hand brake again. Apparently, the brake machine showed that its effectiveness was outside the permitted balance parameters - (MOT speak), and it was the offside that was less effective or put another way the nearside was still sticking.


With the vans 'back end' in the air and the wheels off, I started to check everything again. But this time more thoroughly than before. I started by loosening the hand brake cable at the adjustment in the middle of the van. Then removed each cable from the calliper first checking to see if the handbrake lever was at rest. They were both holding off by a fingernails width even though the cable was very slack.

Surprisingly with this
poxy system this small amount can make the brake bind badly. I freed off the arms as described in a previous post.  Then checked to see how free the movement was on each hand brake cable that ran from the calliper. The OS one was very rough and stiff as the cable moved back and forth in the sleeve. The NS one was less so but on the way.  I changed both to be on the safe side. what's next? The brake pads are not that old, but I checked them anyway. The near side looked OK, and the piston moved freely the same for the offside, but the pads had an unusual wear pattern. It looked like the centre of the pad had crumbled away meaning that only the outer portion was in contact with the disc; could this be the problem? I checked the brake disc carefully; the surface was reasonably flat, and I could not see any reason for the centre wearing faster than the outer edge. The only way to be sure is to replace them. I know! more expense!


Now to fit them. I started by winding the piston back into the calliper. This needs a special tool but if you do not have one you can get away with using an adjustable wrench (the type that bites your fingers if it slips off - ochhh!!) and a G clamp. It is slow and a pain but saves on the price of the tool. Basically, you wind in the adjuster several turns and then use the G clamp to push the piston back. Before you start this, you should pop the hood and take the cap of the brake fluid reservoir and place a cloth over the top to stop the brake fluid pouring all over the engine bay. This may happen if the fluid has been topped up. Once it is wound back clean the mounting bracket area where the brake pad sits and then put a little copper grease on the edges of the pad that sit on the bracket, this prevents sticking. Push the calliper into place, always use the new guide pin bolt provided with the brake pads and tighten to 35 newton meters (26 lbf ft). You should only remove one pair of pads at a time this allows you to reset the piston for the new pads by pumping the brake pedal also reducing the chance of the fluid reservoir overflowing. Spin the disc to make sure it is free and then apply the hand brake with your hand on the lever to make sure it works and releases properly. Then do the same to the other side.


Adjustment settings
Now attach the hand brake cable to each side and adjust the cable. I usually put a bit of copper grease on the adjuster thread to stop it freezing. Wind the adjustment nut up until you obtain a clearance of between 0.1 and 0.5 mm between the operating lever and the stop on the back of the calliper body. You can check this by using a feeler gauge. Now spin the discs, if it feels like it is binding then back the adjustment off until it stops. Hop in the cab and pull on the hand brake several times checking how many notches it come up - one or two is about right but not set in stone. Then check again to see if the discs are binding now the cable has been settled in. If OK, it's time to box it up.


It is a tense time back at the MOT station as they check the hand brake on the brake machine. Has it passed? it looks to me as it's within parameters. Yes! A 'thumbs up,' great news! back to the day job. 


Update to post 18/8/13.

The handbrake is still working properly with no sticking to date. I have noticed that the mpg has increased since sorting out the brakes by as much as ten miles to the gallon which is astounding. So, all those bits I replaced will have payed for themselves.


Friday 28 June 2013

Blow out


The vivaro van as a driving experience is quite lively, responsive and fun to drive. I have not driven a van with this type of get up and go since my MK3 Escort. Which I used to rattle around the streets of London in.

Tool kit.
I was on my way home late one evening from a friend when I heard this loud bang which at first, I thought was a bit of debris in the road. Seconds later I was fighting the steering wheel to keep it straight, I was three lanes in on the motorway and travelling at quite a lick, so needed to get to the hard shoulder ASAP. There was not a lot of traffic on this usual very busy section. Luckily, I found myself in a dead zone where all the other vehicles were well in front of me or far behind. The only fly in the ointment was a tractor unit in the inner most lane.


Now stopped on the hard shoulder I took stock for a couple of seconds, pulled on my high viz vest and got out of the cab to look at the front wheel. Man! That's the flattest flat I've seen since my mark three had a blow out on the M 11 all those years ago. Whoosh! - a sixty-footer went by - I need to get the van closer to the embankment if I'm going to change this wheel! First, I need to check in and let people know what has happened.


Changing a wheel at the side of a motorway is quite dangerous but standing about in cold weather waiting for someone to turn up to do the work is just as bad. Anyway, it will not take me long he says as I have changed loads of wheels for other people in the past and gotten it down to a fine art. Ten minutes should see it done and dusted. How wrong can you be. The van had a 'never been used' wheel kit under the seat. Off to a good start there! I found the special security key for the spare wheel cage and proceeded to undo this first. The kit was supplied with a basic ratchet, extension bar and toe loop that screwed in as a handle for the ratchet. I started with the spare wheel first because I knew that if I could not get the bolts undone then I was wasting my time. The special nut came loose quite easily and so did the ordinary nut to start with but there was a problem! It was just spinning round and not unscrewing. The thread was knackered! what was I going to do? I dived into the back of the van and found my largest screwdriver and wedged it between the body work and the spare wheel cage. A gamble I know but it had to be done. I finally got it off after about a twenty-minute struggle.

When jacking a vehicle up at the side of a motorway you should only have it jacked up and wheel off for the shortest possible time. The pressure wave of big sixty footers going by can pull the van off the jack. Then you're in a heap of trouble. Ten minutes later the wheel was on, back on the floor wheel nuts tight, ready to roll. This part of the job would not have been so easy if I had not put a little grease on the wheel nut threads the last time the wheel had been off and tightened to the right torque. (140 Nm 103 lbs ft) Before leaving the hard shoulder you should get your vehicle up to at least sixty miles an hour so that when you join the carriageway again you are not a slow-moving hazard to the traffic coming up behind you. This is one of the only times you should be travelling down the hard shoulder at speed.