Showing posts with label tyre. Show all posts

Thursday, 14 January 2016

Plastic repair!

There are only so many jobs that you can do for yourself when it comes to working on your van. I, like the rest of you, have to use other service providers for certain jobs. The main one being tyres, it is far better to let them do the job - seeing as they have all the kit!

OK! with that in mind we had a couple of tyres that needed to be replaced because they had worn out. So, took the van in to get them replaced.

A couple of days later I noticed something was flapping about under the van, which was strange, so I decided to have a look, jacked the front up and discovered what looked like a mud flap/ deflector at the back of the wheel arch which was not broken before the new tyres were fitted. I do not like complaining or pointing the finger at other trade professionals because I have been on the end of “It was OK until you worked on it” situation. In this case however I'm going to complain. Why? Because they had also drilled the wheel nuts on so tightly, I had to use a meter long handle on my breaker bar with socket to move it! They should know better! They don't know it, but we now use another tyre fitter for all our work.

 The upside of this is that our good friends at Plasweld were able to weld the broken plastic back together. Which saved us having to track down an expensive replacement. They are wizards with anything plastic whether motor related or not.

To show our appreciation I'm going to point you in their direction of Plasweld - I know the web site shows a lot of motor bike work but do not let that put you off. The same materials are used by both car and bike etc.


Sunday, 19 October 2014

Great escape!

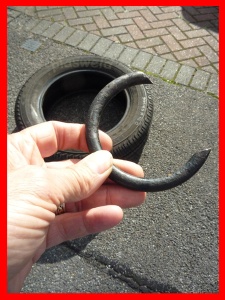
part-of-spring
The other day I had to nip out to get some materials. A bit of an understatement as it involved a journey of a hundred miles each way. As we were going up the bypass at the beginning of the trip there was a metallic clanging sound of something hitting the underside of the truck which slowed progress as I considered whether or not to stop and check. Needless to say, I didn't as the van felt and ran OK.
Ninety odd miles later. We stopped at a well-known supermarket for a break. To be met by a shushing noise. A quick look round the truck did not show anything untoward but the shh persisted; then I noticed that the rear near side tyre looked soft. In that short time, it was half flat, the air was coming out that fast. I can't believe it - another puncture! and its 
spring-in-tyre
the new one! I will not repeat what was said but I think you can guess!  
I ran round to the cab pulled out the jacking kit and got it in place just before it went completely flat. Ten minutes later the Tyre was changed.
Before we returned home, I wanted the puncture repaired, so tracked down a tyre shop and took it in. "No prob' mate have that done for you in a jiffy". Then things went sideways I saw him call over a colleague and then me. It took us all by surprise. I was told that I had been extremely lucky that it had not blown apart when it happened. The pictures speak for themselves!

Friday, 28 June 2013

Blow out


The vivaro van as a driving experience is quite lively, responsive and fun to drive. I have not driven a van with this type of get up and go since my MK3 Escort. Which I used to rattle around the streets of London in.

Tool kit.
I was on my way home late one evening from a friend when I heard this loud bang which at first, I thought was a bit of debris in the road. Seconds later I was fighting the steering wheel to keep it straight, I was three lanes in on the motorway and travelling at quite a lick, so needed to get to the hard shoulder ASAP. There was not a lot of traffic on this usual very busy section. Luckily, I found myself in a dead zone where all the other vehicles were well in front of me or far behind. The only fly in the ointment was a tractor unit in the inner most lane.


Now stopped on the hard shoulder I took stock for a couple of seconds, pulled on my high viz vest and got out of the cab to look at the front wheel. Man! That's the flattest flat I've seen since my mark three had a blow out on the M 11 all those years ago. Whoosh! - a sixty-footer went by - I need to get the van closer to the embankment if I'm going to change this wheel! First, I need to check in and let people know what has happened.


Changing a wheel at the side of a motorway is quite dangerous but standing about in cold weather waiting for someone to turn up to do the work is just as bad. Anyway, it will not take me long he says as I have changed loads of wheels for other people in the past and gotten it down to a fine art. Ten minutes should see it done and dusted. How wrong can you be. The van had a 'never been used' wheel kit under the seat. Off to a good start there! I found the special security key for the spare wheel cage and proceeded to undo this first. The kit was supplied with a basic ratchet, extension bar and toe loop that screwed in as a handle for the ratchet. I started with the spare wheel first because I knew that if I could not get the bolts undone then I was wasting my time. The special nut came loose quite easily and so did the ordinary nut to start with but there was a problem! It was just spinning round and not unscrewing. The thread was knackered! what was I going to do? I dived into the back of the van and found my largest screwdriver and wedged it between the body work and the spare wheel cage. A gamble I know but it had to be done. I finally got it off after about a twenty-minute struggle.

When jacking a vehicle up at the side of a motorway you should only have it jacked up and wheel off for the shortest possible time. The pressure wave of big sixty footers going by can pull the van off the jack. Then you're in a heap of trouble. Ten minutes later the wheel was on, back on the floor wheel nuts tight, ready to roll. This part of the job would not have been so easy if I had not put a little grease on the wheel nut threads the last time the wheel had been off and tightened to the right torque. (140 Nm 103 lbs ft) Before leaving the hard shoulder you should get your vehicle up to at least sixty miles an hour so that when you join the carriageway again you are not a slow-moving hazard to the traffic coming up behind you. This is one of the only times you should be travelling down the hard shoulder at speed.

Wednesday, 2 January 2013

Winter checks


This post is a little behind the curve when it comes to those winter checks. Those who were on the ball would have dealt with these important checks part way through the autumn months. Then again with the way the climate is going you could have snow in the middle of summer.  Knowing when to do it has become a bit of a guessing game. Let's just say that historically the autumn is the time to do it.

 Things that should be checked:

         Anti-freeze,
         Battery,
         Wind screen wipers and screen wash.
         Tyre pressures and tread depth.

Anti-freeze

The most critical thing you should be checking is the strength of the anti-freeze. Nowadays it is more than an additive that stops the engine freezing, popping a core plug and/or stripping a cambelt. It also stops sludge building up causing blockages and retards corrosion in the engine block.


It is quick and easy to check with an anti-freeze tester.  Which is basically an overgrown eye dropper with discs in it. With the cap off the expansion tank, you place the tube of the tester into the fluid and draw it up into the clear tube once the flow has stopped and the discs have stabilized into two groups some floating and others sinking you can work out how strong the mix of anti-freeze is. It is far better to have more dices floating, giving you the protection needed nowadays for double minus figures. Over recent years this has become more important with temperatures dropping to an unprecedented minus twenty-five degrees centigrade.

 Battery.

Most modern-day batteries are sealed and filled with a gel, so the main check here is to see if the terminals are clean, tight and not corroded. If they are, you can use boiling hot water to remove it. Be careful using this method and only do one terminal at a time so you do not short the battery out. Once done smear a small amount of petroleum jelly on each terminal to stop the corrosion coming back. If you have the older lead acid batteries that need to be topped up with de-ionized water, you are more likely to find the terminals corroded. The same clearing method applies. You will also need to check that the level of the water in the cells is covering the plates, if not they will need topping up with deionized water.

Windscreen Wipers and screen wash.

Windscreen wipers are one of the most neglected items on a vehicle along with tyres. Some people will not replace their wiper blades until they are hanging off and even then, wait till the next service. It beats me how they see out the window to drive in the pouring rain and not hit what is in front of them. The freezing weather destroys the efficiency of your wipers faster than at any other time of the year. When they slide across that ice cover screen it makes minute nicks in the wiping edge. That is if they have remembered to un-stick them from the screen not burning out the wiper motor, it still surprises me how often this happens. You have been warned. When the temperature drops so the strength of the screen wash should go up. This prevents it freezing so you can use it.


Tyre's. 

What can I say, Tyres are the most neglected safety item on the vehicle! You should check the pressures regularly as the right pressures will save you money on fuel. If the tread depth is down to the wear bars (one point six millimetres you should replace them as this increases the chances of aqua planning and increases fuel consumption among other things.


If you look after your vehicle, it will look after you.